Golden hour photography advice was written for landscapes and human models. Both stay where you put them. Pets do not. The “shoot at sunset for warm light” guidance assumes you can wait for the right moment and the subject will hold still. With a pet, the right moment is when they happen to do the thing you wanted, and the light is whatever the light is.
A more useful framing is to think about light quality rather than time of day. The best reference photos for pet portraits come from soft, diffuse, even light on the subject, with the pet relaxed and the camera close enough to capture detail. Time of day only matters insofar as it changes the light.
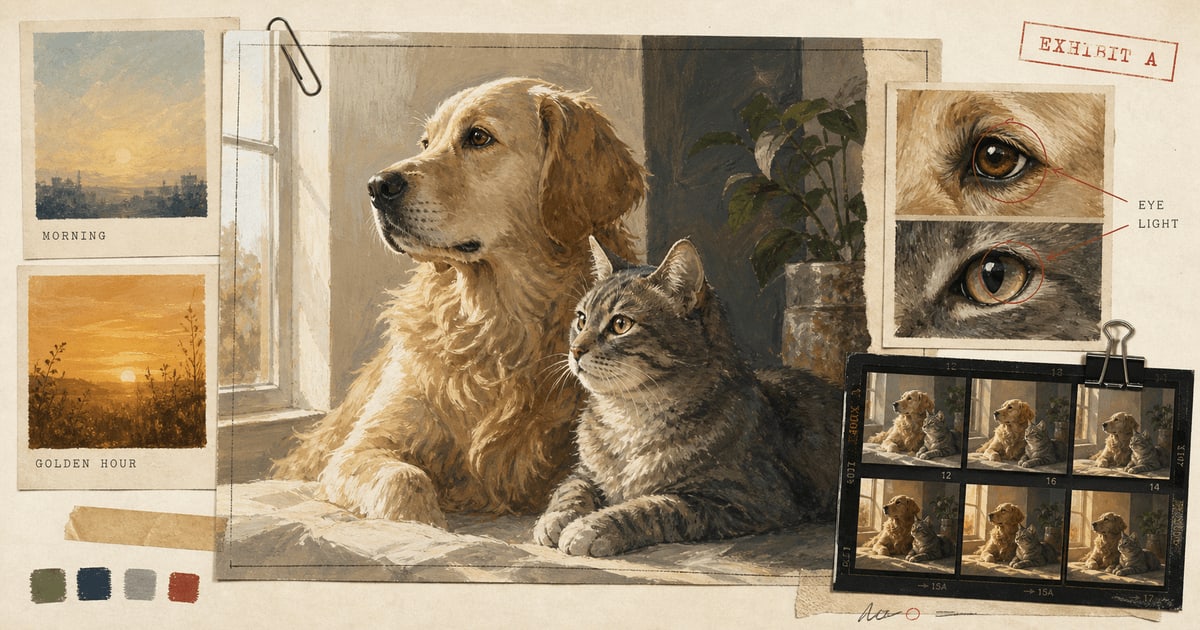
The thesis: for indoor reference photos, soft window light is reliably the best option. For outdoor reference photos, overcast days produce more usable images than sunny ones. Avoid noon overhead sun and low-angle sunset sun for technical reasons explained below.
Why Light Quality Matters More Than Time
A light source has two important properties for portraiture: hardness and direction.
Hard light comes from a small or distant source relative to the subject, and it casts sharp-edged shadows. The midday sun is hard light. A bare bulb in a ceiling fixture is hard light. Hard light reveals texture but also exaggerates flaws, deepens shadows under the eyes and chin, and produces a harsh contrast that flattens fur detail.
Soft light comes from a large or close source, or from light that has been diffused (passed through a cloud, a curtain, a translucent surface). Soft light wraps around the subject, fills the shadows, and shows the eyes clearly. Overcast skies are soft light. North-facing windows are soft light. Studio softboxes are soft light.
For pet portraits, soft light is what you want. The artist needs to see the eye structure, the texture of the fur, the color of the coat. Hard light produces deep shadows that hide all three.
Direction matters too. Light hitting the pet from above (overhead sun, ceiling fixture) creates shadow eye sockets and a dark muzzle. Light hitting from the side (window, lamp at angle) reveals form and fur direction. Light hitting from in front (window the pet is facing, photographer with light behind them) flattens the subject but shows color clearly.
The best reference light is soft, somewhat sided, slightly above eye level. A window the pet is facing, with the photographer between the pet and the window, gives most of this.
Indoor Reference Photos
Soft window light is the most consistent indoor option.
Find a window in the home that gets indirect light (not direct sun streaming through). North-facing windows in the northern hemisphere give the most consistent soft light throughout the day. East windows in the morning and west windows in the afternoon also work if the sun is not directly through them.
Position the pet so they are facing the window or angled toward it. Stand or sit between the pet and the window so the light hits the pet from the same direction the camera sees them. Avoid backlighting the pet (window behind them) for reference work because the subject will be in silhouette.
Avoid mixed light. If you have a window throwing daylight on one side of the pet and a warm yellow lamp throwing tungsten light on the other side, the photo will have color casts in opposite directions and the artist will have to guess which is the true coat color. Turn off interior lights when shooting near a window.
Phone cameras handle window light well. Most modern phones meter the scene reasonably for window-lit indoor portraits, especially with the pet’s face occupying a large portion of the frame.
Outdoor Reference Photos
Overcast days are the photographer’s friend.
Clouds turn the entire sky into a giant softbox. The light is diffuse, even, and direction-less in a way that flatters subjects with both very dark and very light coats. There are no harsh shadows under the eyes. The eyes show clearly. The coat color reads true.
If you can choose your day for outdoor reference photos, choose an overcast one. The portrait artist will thank you.
Bright sunny days are harder. The shadows are deep, the highlights are blown, the eyes go into shadow under brow ridges, and dark-coated pets often go completely featureless in the shadow areas. If you must shoot in bright sun, find shade. Open shade (under a tree canopy, against the shaded side of a building, on a covered porch) gives softer light while keeping the natural daylight color.
Why Noon Overhead Sun Fails
Light directly overhead casts shadows straight down. On a pet, this means the eye sockets go dark, the muzzle casts a shadow under the jaw, and the top of the head is brightly lit while the face below the brow line is dim.
The artist needs to see the eyes. Most pet portraits live or die on the eye rendering. Noon sun puts the eyes in shadow.
If you are out at noon and want to take a reference photo, find shade. Move to a porch, under a tree, against a wall, into a garage with the door open. Even a few feet of shade transforms the light from harsh-overhead to soft-diffuse.
Why Low-Angle Sunset Sun Can Fail Too
Sunset and sunrise light is warm. The color temperature shifts toward red and orange as the sun gets lower because the light is traveling through more atmosphere, scattering out the blue wavelengths.
On a light-coated pet (white, cream, golden), this looks beautiful. The warm light flatters the coat and gives the portrait a glow.
On a dark-coated pet (black, dark brindle, dark brown), the same warm low-angle light can do something unflattering. The dark coat picks up the red and orange cast and reads as having a strange color overlay that is not actually the pet. A black Lab in sunset light photographs as a dark-brown-with-orange-cast Lab, which is not what the artist needs as reference.
For dark-coated pets, midday shade or overcast is more reliable than the warm-toned golden hour. For light-coated pets, golden hour can be excellent if you can get the pet to cooperate during the brief window.
The Exposure Problem for Very Dark and Very Light Coats
Ansel Adams, in The Camera (1980), introduced the Zone System: a framework for thinking about exposure in terms of the full range of tones from pure black (Zone 0) to pure white (Zone X), with middle grey at Zone V.
Camera meters, including phone cameras, assume the average scene reflects roughly 18% grey. The meter tries to expose for middle grey. This works fine for medium-toned subjects.
For very dark pets, the meter sees a dark subject and tends to overexpose, brightening the photo until the black coat reads as muddy dark grey. The fur detail goes flat. To fix this, dial the exposure compensation down by one stop (on a phone, drag the exposure slider down, or tap on a brighter part of the frame to lock exposure there).
For very light pets, the meter sees a bright subject and tends to underexpose, darkening the photo until the white coat reads as muddy grey. The fur detail goes flat in the opposite direction. To fix this, dial exposure compensation up by one stop, or tap on a darker part of the frame.
This is the single biggest improvement most pet owners can make to their reference photos. The default phone exposure is wrong for both very dark and very light pets, and a one-stop adjustment fixes it.
What This Means in Practice
Pick a window with soft light. Position the pet facing it. Get close. Take twenty photos because the pet will only do the thing for two of them.
If outdoors, wait for overcast or find shade. Avoid noon sun and avoid sunset sun on dark coats.
Adjust exposure compensation for very dark or very light pets.
Send the artist the photos where the eyes are clear, the coat color reads true, and the pet looks like themselves. More on what to send at /blog/perfect-pet-photo-tips.
Then place the order and stop second-guessing the photo. If the eyes and the coat are clear, the artist has what they need.
Sources
- Ansel Adams, The Camera (1980), and the broader Zone System literature on exposure for tonal range.
- Standard photographic exposure theory, including the convention that camera meters calibrate to 18% grey reflectance.
Welcome perk
Free expedited delivery on your first portrait
Get your digital proof in 1-2 business days instead of 2-3, free on your first portrait. Normally a $10 upgrade.
No spam. Just the perk and the occasional new style or guide.
Check your inbox for your code.